The exhaust system is too long or has too many turns or restrictions.
Solution
Do not use the appliance until the exhaust system has been cleaned and/or repaired.
Using the appliance with severely restricted exhaust is dangerous and could result in a fire or other property damage.
Check the outside dryer vent while the appliance is operating to make sure there is strong airflow.
If the exhaust system is extremely long, have it repaired or rerouted.
Cause
House exhaust system blocked.
Solution
Keep the area around the dryer clean and free of clutter. Check vent hood for damage or lint clogging. Make sure the area around the vent hood is clear.
DETAILS BELOW:
POPULAR PROBLEMS THAT MAY CAUSE d80, d85, d90 & d95 ERROR CODES
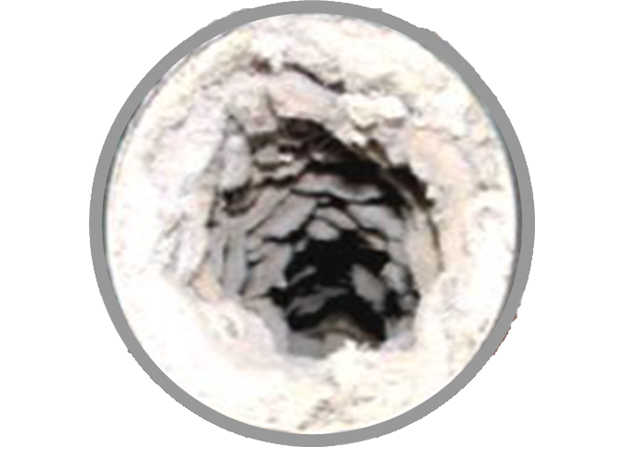
Duct clogged by lint. If the duct is clogged, explain & request the customer to have the duct cleaned.
Duct kinked. If the duct is kinked, straighten out the duct and advise the customer to not use flexible duct and only use semi-rigid duct.
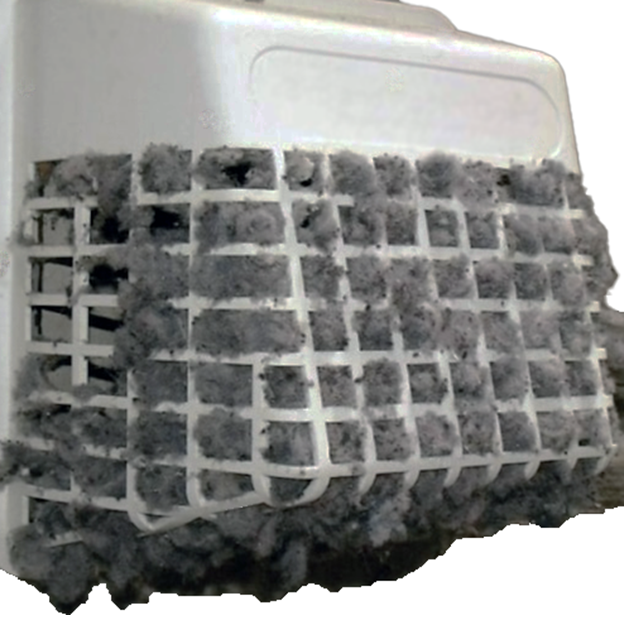
Duct blocked by screen. If the duct is blocked by screen on end of air duct explain to customer it may get clogged with lint and this can lead to blocking the air flow through the vent. This may result in weak drying performance, long drying time or not drying at all.
Flap restricted (Flap is not opened). If the duct cap flap is restricted, this will reduce air flow & increase dry times. Remove restriction from flap to allow proper venting.
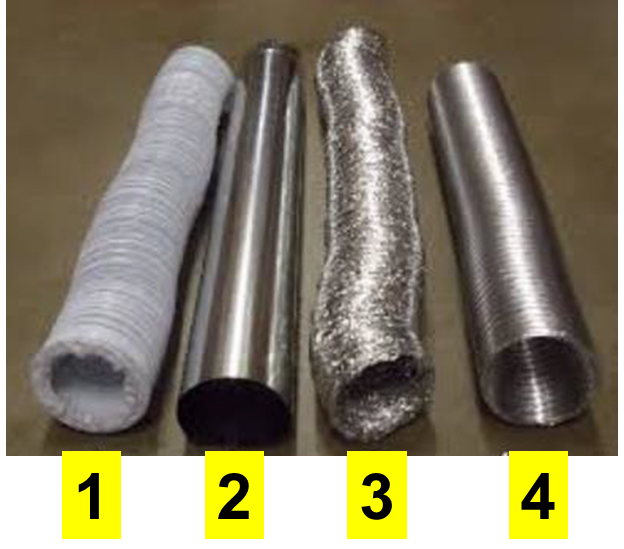
Check flexible venting material between dryer & house rigid vent and compare to the below types of duct material.
1. Vinyl flex vent – Not approved for use on LG Dryers
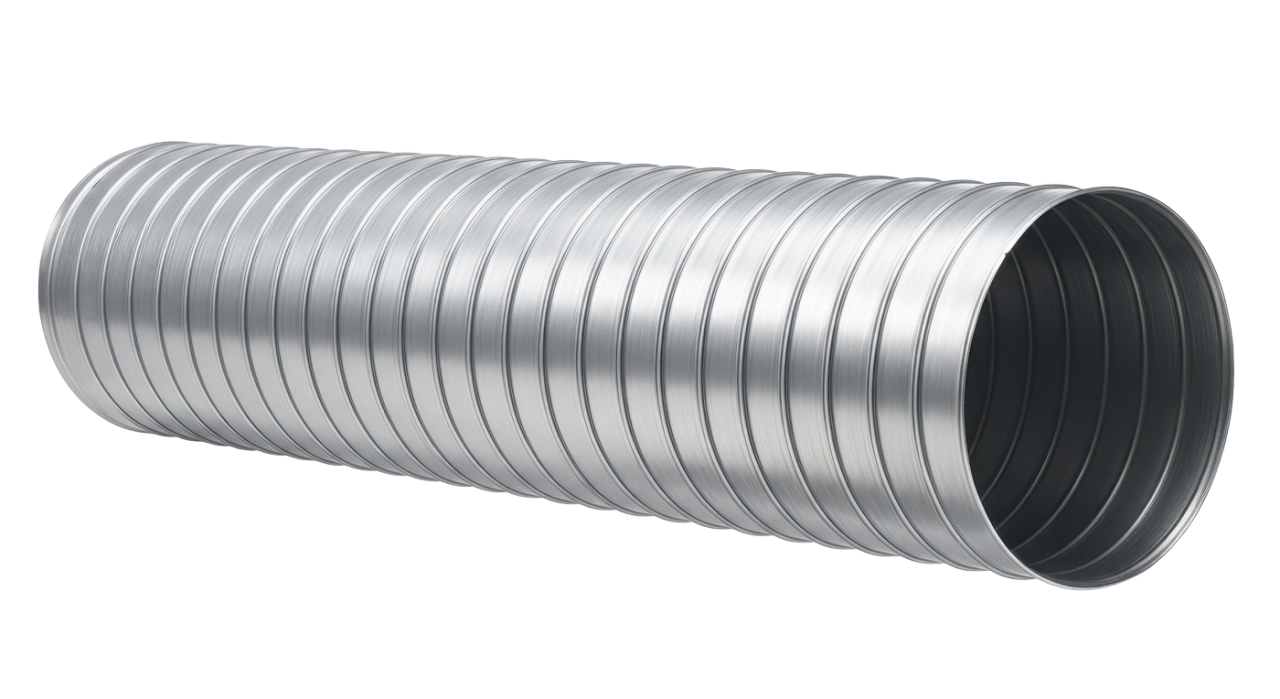
2. Rigid vent – Best vent material, but difficult to route venting
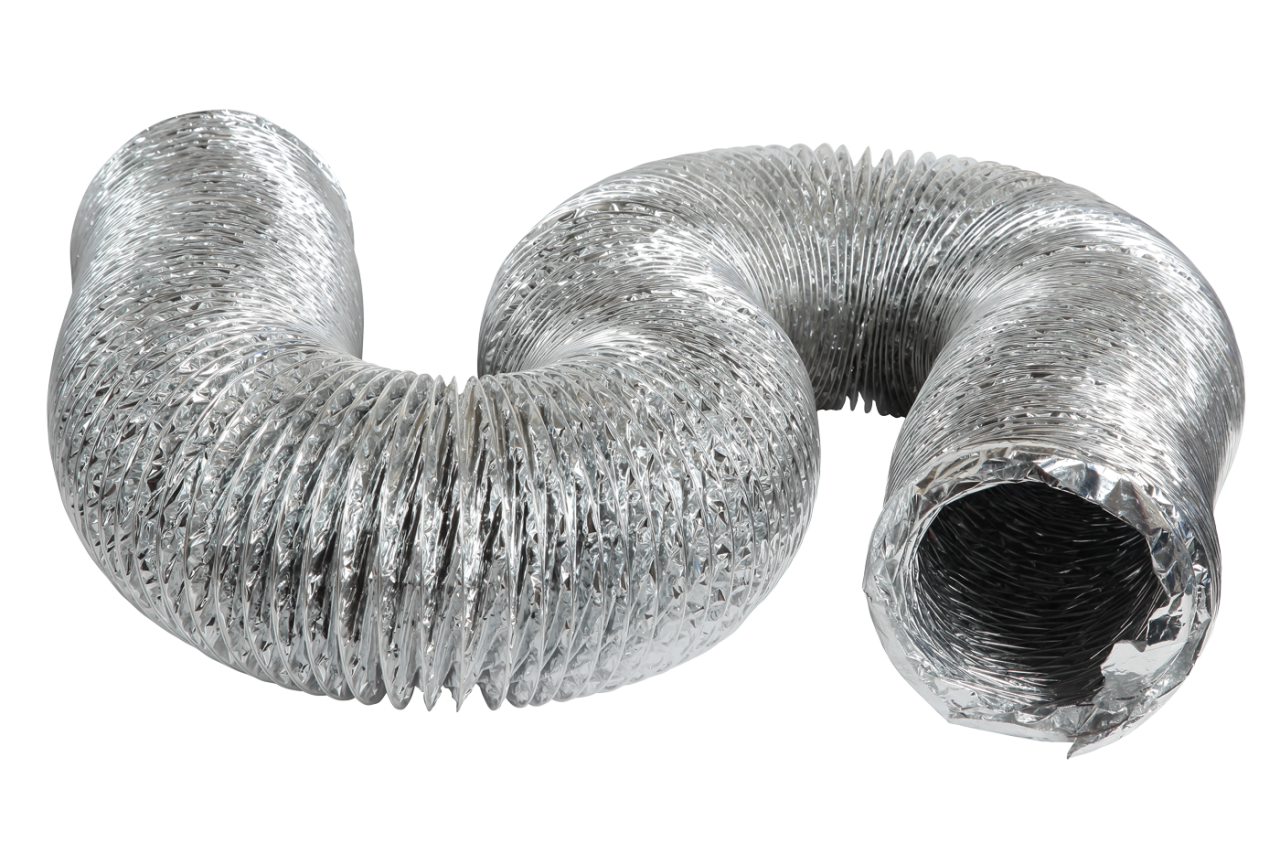
3. Foil flex vent – Not approved for use on LG Dryers
4. Semi Rigid vent – Only approved flexible venting material for use in LG Dryers
Vinyl and Foil Flex vent must not be used even connecting the dryer to main exhaust duct. Semi-rigid and rigid duct is the only acceptable venting material.
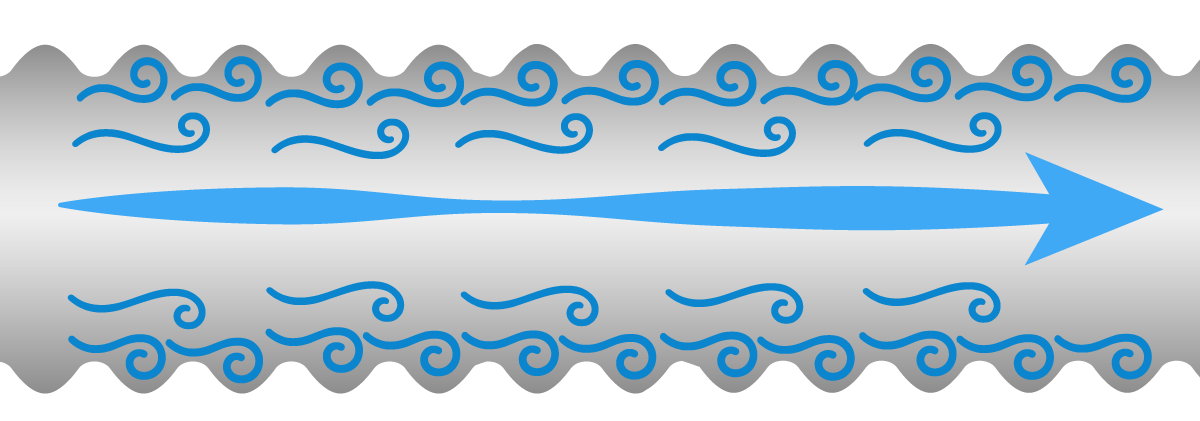
FLEXIBLE FOIL DUCT VENTING causes turbulences in air flow due to deep corrugations of flexible foil duct creating back pressure on ventilation system and reduced air volume. Reduced air flow is detected by Flow Sense algorithm as a vent blockage and will display error message d80, d85, d90 or d95.
See the illustration below of flexible foil duct venting air turbulence.
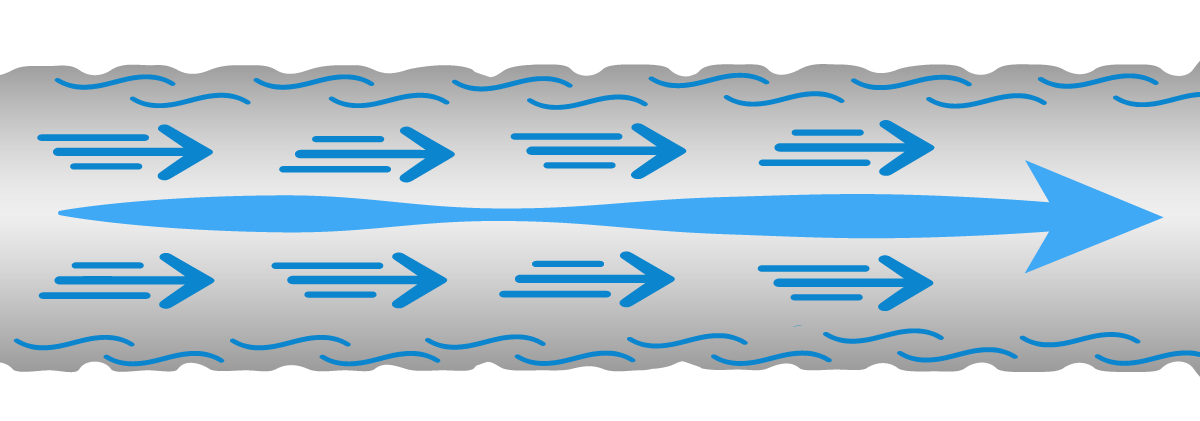
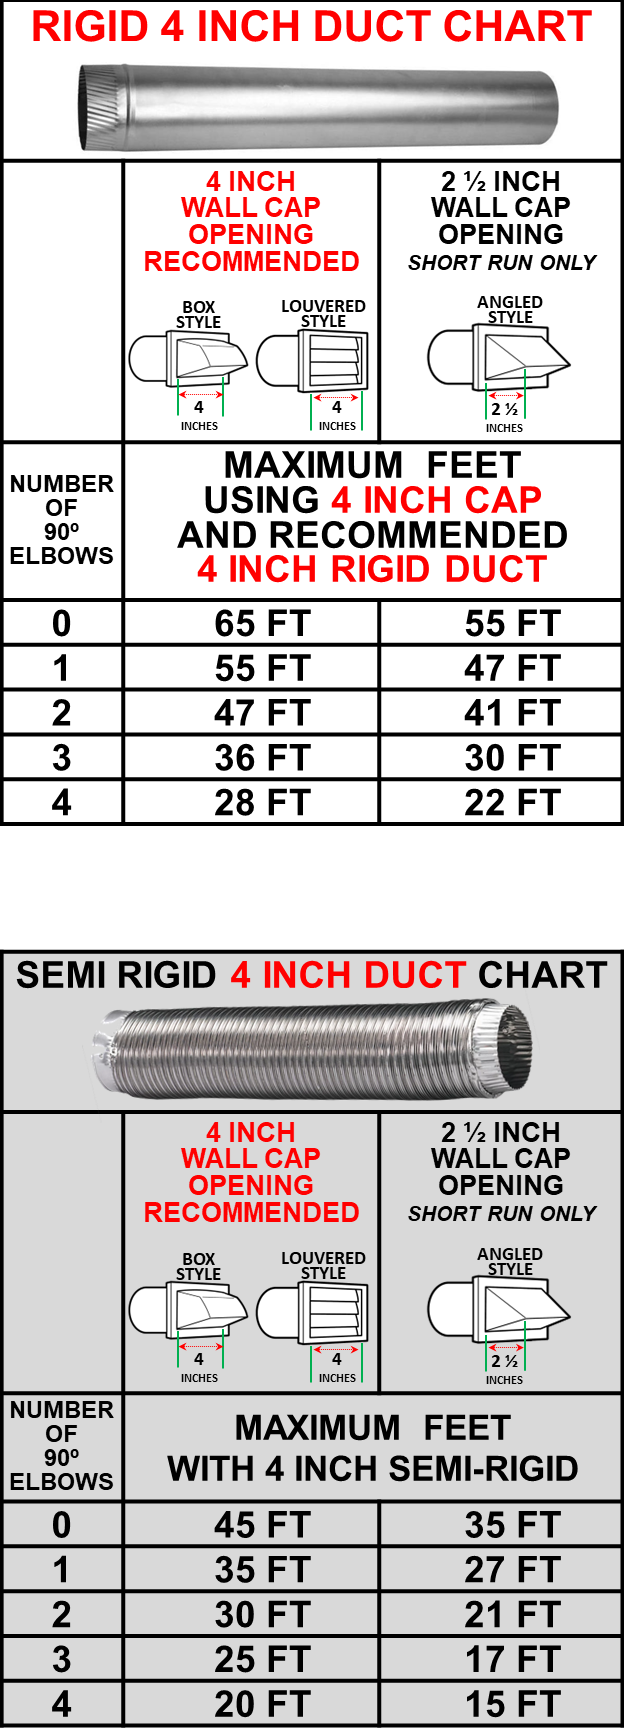
Use only 4-inch rigid, semi-rigid or flexible metal ductwork inside the dryer cabinet and for venting outside. SEMI-RIGID vent does not have the deep corrugations as foil flex venting. SEMI-RIGID and RIGID are smoother inside allowing more air flow and are the only venting materials approved for installation on LG Dryers. See the illustration below of Semi-Rigid duct venting with no turbulence.
Are there multiple bends in the flexible duct between the dryer and the wall? Note: each bend accounts for 10′ of duct. See examples below.
Flex duct bends do count in total duct run. As you can see below these customers had 30 to 40 feet of calculated duct before it reached the duct through the wall.
USE THE LG DUCT CHART BELOW TO INSURE PROPER INSTALLATION
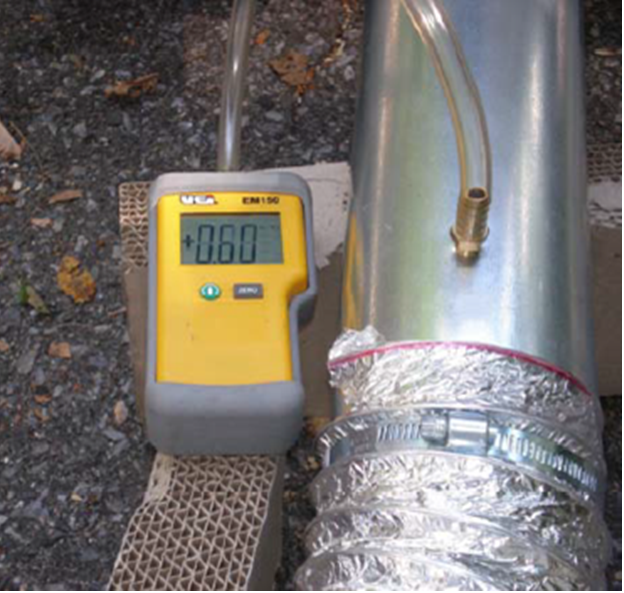
Is the static vent pressure 0.6″ W.C. or less? If not, check for a restriction in customer vent or for vent cap problem. If the customer’s vent goes up to the roof, the vent cap screens could be blocked as well as the duct.
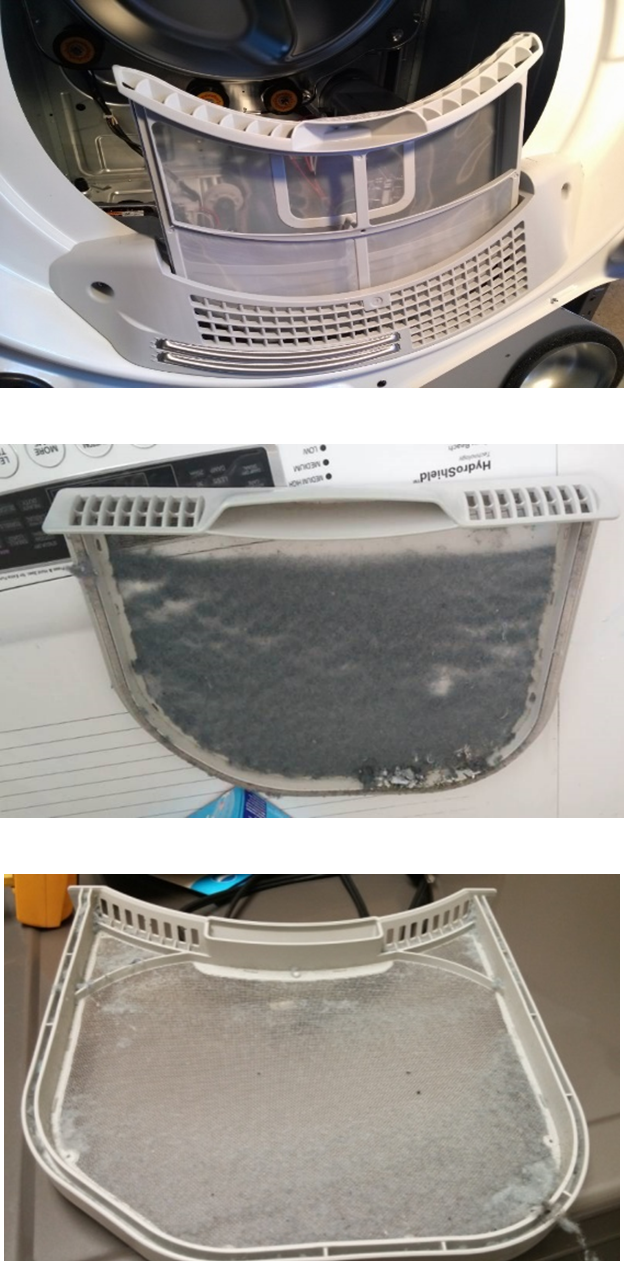
Check lint screen.
Is the lint screen blocked due to lint buildup?
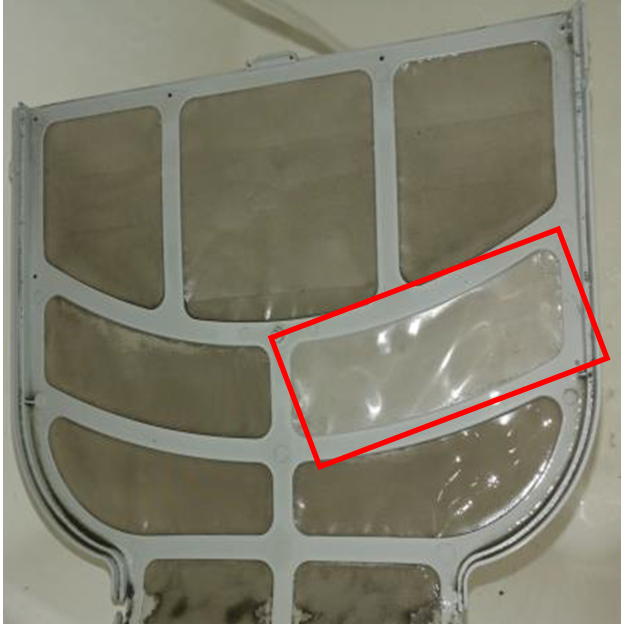
Be sure to check the lint screen for waxy build up from fabric softener and dryer sheets. If water beads up on the lint screen when you drop water on it, then air will not pass through the screen very well. The lint screen may be clear of lint but is clogged from waxy buildup. Clean with a soft brush and hot water. Advise the customer if fabric softener and dryer sheets are used this lint filter maintenance will need to be done routinely.
Water drop test reveals beads of water on top of lint screen due to buildup.
Waxy build up on lint screen.
Difference after cleaning build up.
Check vent cap
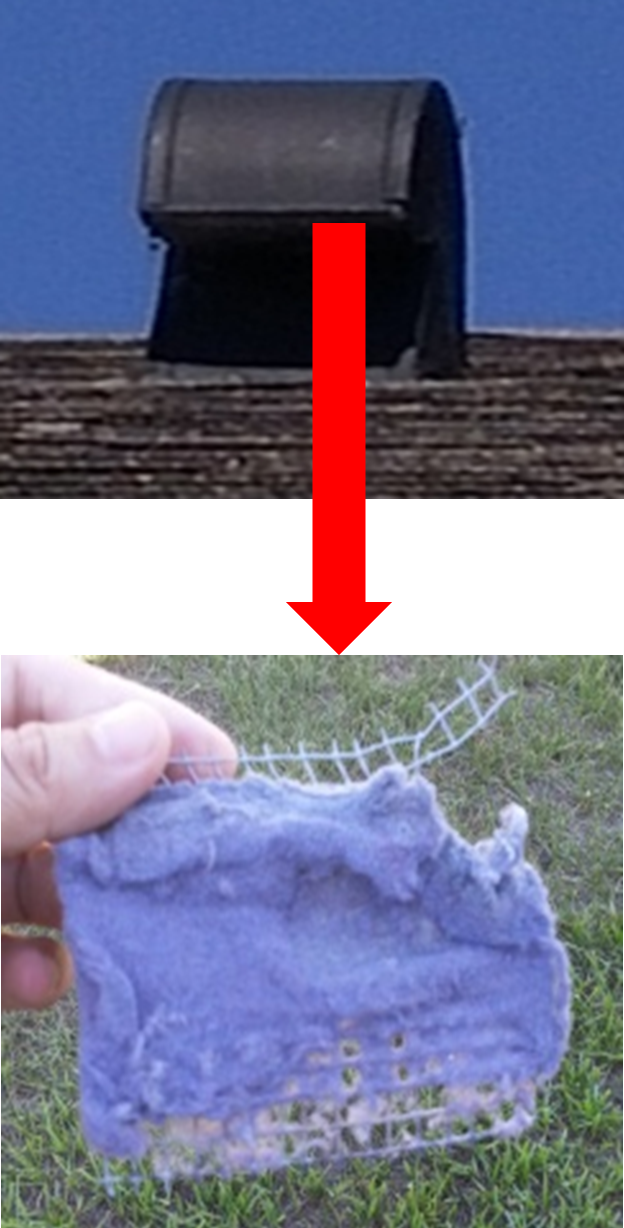
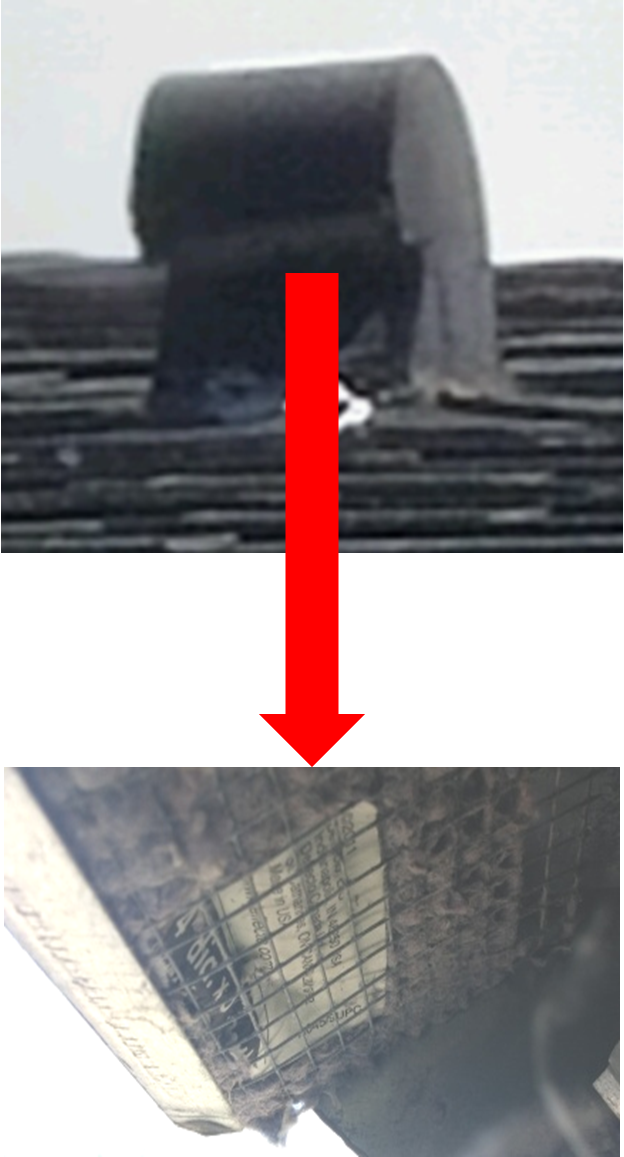
Is the vent cap blocked or clogged? Seeexamples of Roof Vent Cap Screens found to be clogged up on the rodent screen.
Roof Vent Cap Screens found to be clogged due to customer never having duct work properly cleaned out by professional once a year or more depending on usage. See examples below.
Check vent cap
Is the vent cap blocked or clogged?
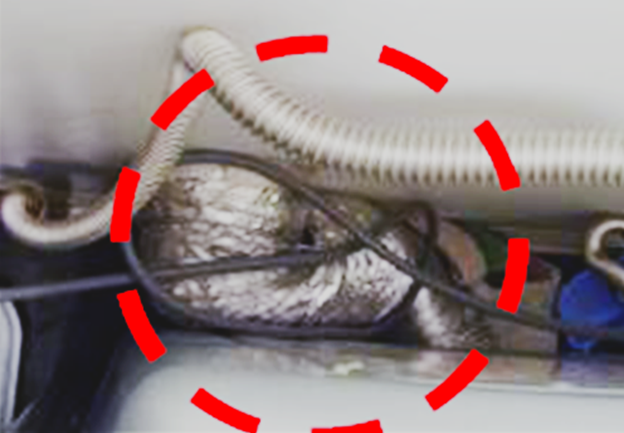
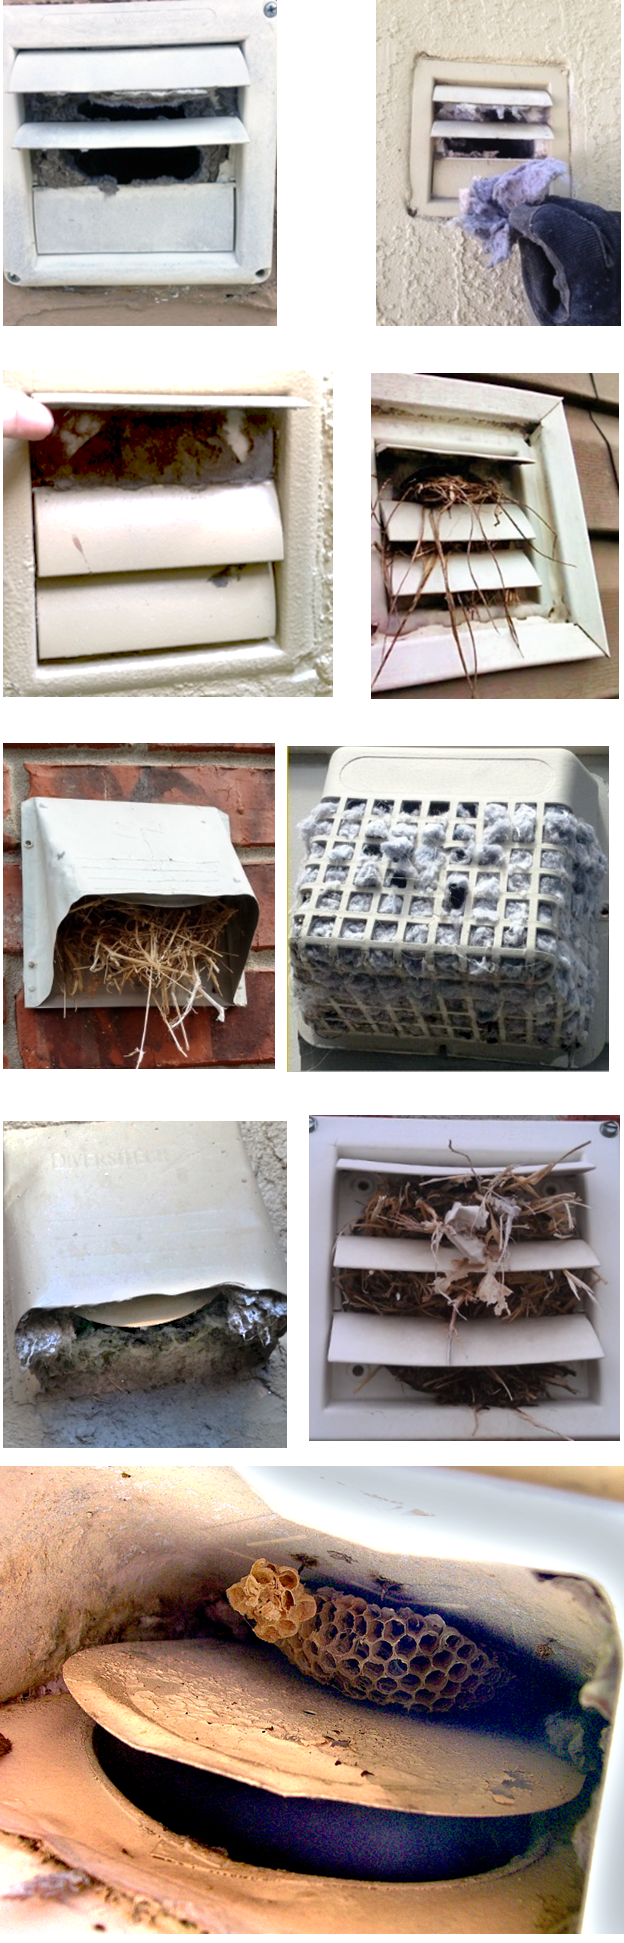
See examples below of Exterior Wall Vent Caps found to be clogged.
Special Case from the field.
Duct flapper not being allowed to fully open due to screws customer installed.
Customer installed a screen on the vent cap held in place with two screws. The tech removed the screen but didn’t take out the screws and the screws were only allowing the cap door to open approximately 50%. Once this was resolved the high limit thermostat had to be replaced due to being tripped excessively from blocked airflow. See the photo and diagram below.
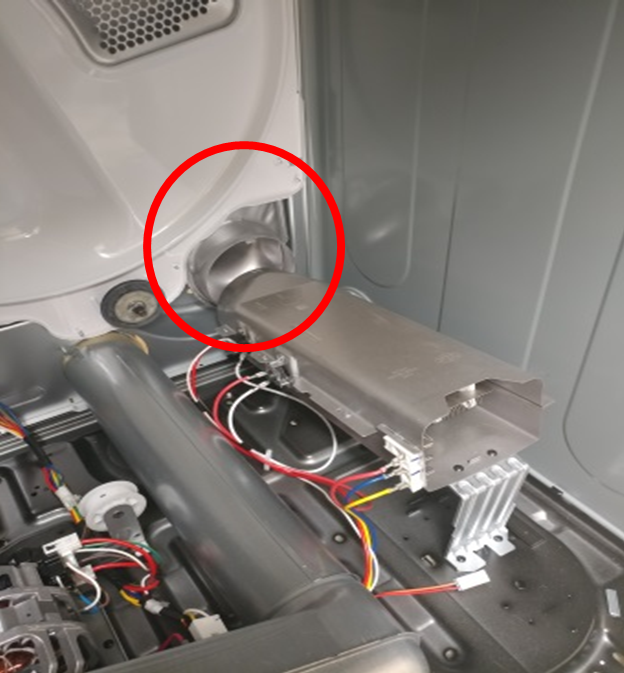
Verify the heater is not disconnected from duct. New Installs especially, check to see if the heater or vent pipe is disconnected inside the unit. It may have come loose during shipping or delivery.
Verify there are no obstructions inside the unit such as a foreign item caught in the blower wheel. See below example of a dryer sheet caught in the blower wheel.
Is the high limit thermostat prematurely opening? The high limit thermostat opens at 257° ± 9°F and it closes at 221° ± 9°F. See the picture below.
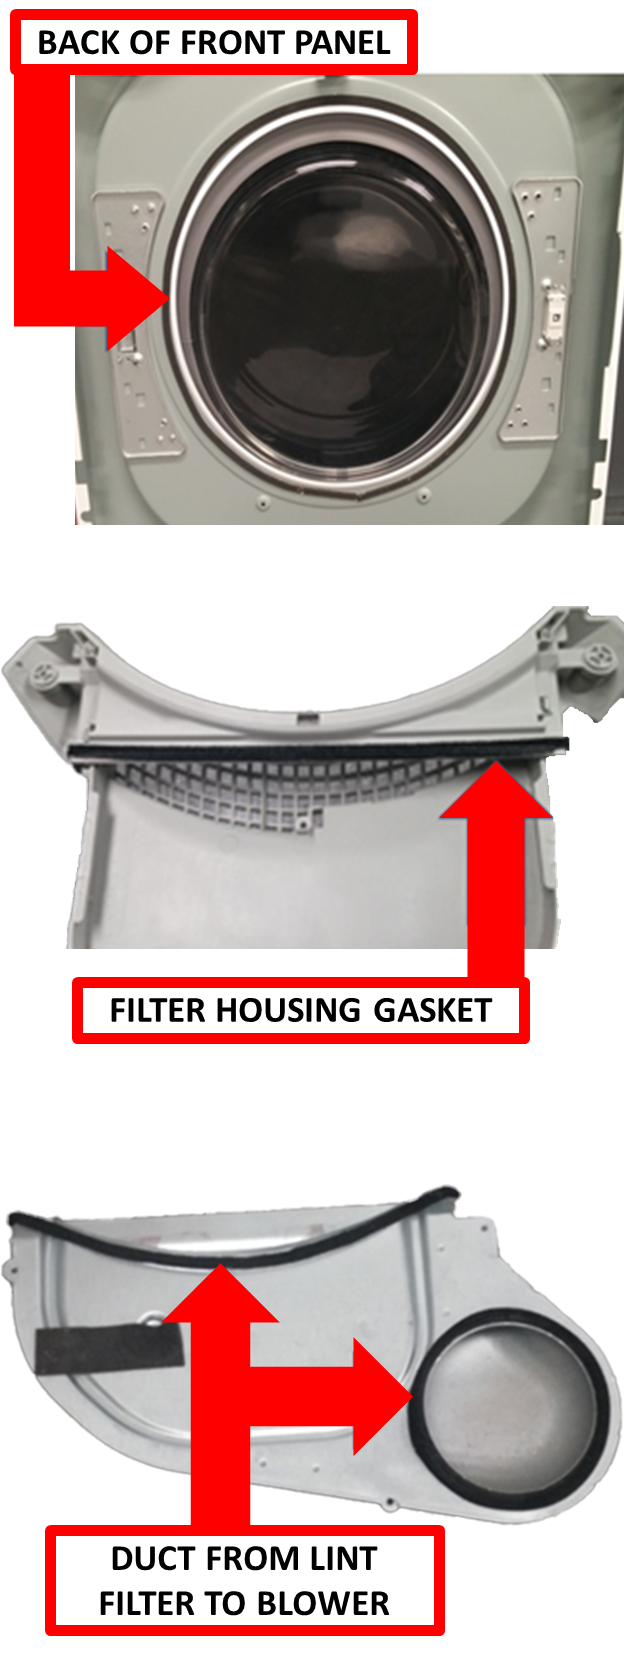
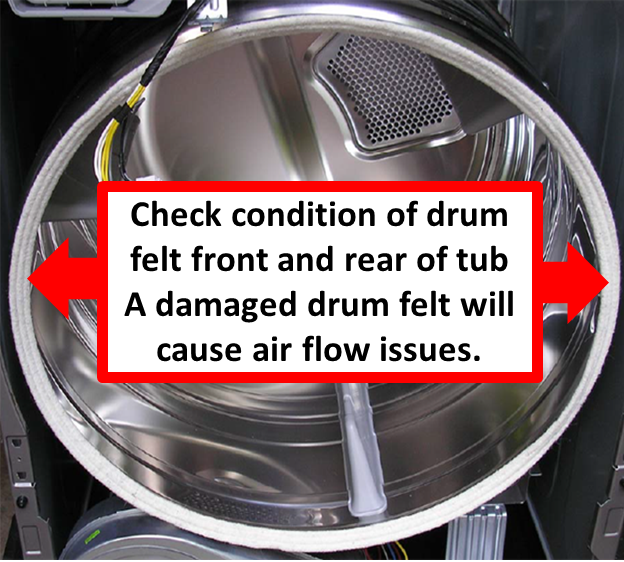
CHECK FOR DEFECT OF INTERNAL GASKETS
HOW TO TURN OFF "d80" NOTIFICATIONS
CLEARING “d80” PANEL NOTIFICATION AFTER ENSURING EXHAUST VENTING DUCT HAS BEEN CLEANED
Sometimes, even after having executed due diligence with respect to maintenance of the venting duct conduit by thoroughly cleaning it, the initial “d80” notification still pops up in the display window every time dryer is powered “on”. That specific notification can be disabled if believed to be oversensitive.
■ Overview
Flow restriction building inside exhaust venting duct from accumulation of lint and moisture can cause temperature inside the drum to rise high quite rapidly risking causing a fire.
Dryers are equipped with heat sensors that will shut down operation of the appliance in such case while a “d80” notification appears in display window to alert customer.
Sometimes, even after having thoroughly cleaned the venting duct, the “d80” notification persists being displayed. If that is the case with your dryer, you will find instructions on clearing the persisting “d80” notification code from the display panel in the troubleshooting section below.
The duct error codes can be disabled on the models listed below. If the model you are working on is listed below then simply follow the button sequence listed after the chart.
DLE30* / DLG30*
DLE33*
DLE35* / DLG35*
DLE73* / DLG73*
DLEX37* / DLGX37*
DLEX38* / DLGX38*
DLEX39* / DLGX39*
DLEX40* / DLGX40*
DLEX42* / DLGX42*
DLEX43* / DLGX43*
DLEX45* / DLGX45*
DLEX72*
DLEX73*
DLEX78* / DLGX78*
DLEX79* / DLGX79*
DLEX42* / DLGX42*
Power on then quickly press and hold both “Timed Dry” & “Signal” buttons simultaneously for 3 seconds.
See picture below.
You should see “OFF” in the display. To re-enable the duct error codes just repeat the button sequence and you should see “ON” in the display.
The duct error codes can be disabled on the models listed below. If the model you are working on is listed below then simply follow the button sequence listed after the chart.
DLEX89* / DLGX89*
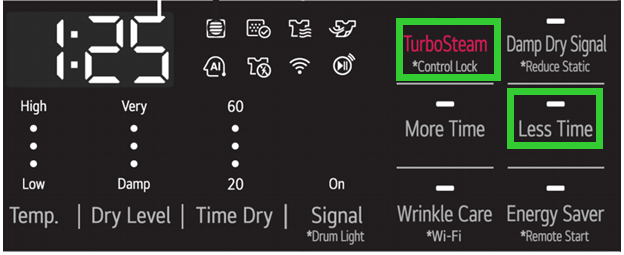
Power on then quickly press & hold both “TurboSteam” & “Less Time” buttons simultaneously for 3 seconds.
See picture below.
You should see “OFF” in the display. To re-enable the duct error codes just repeat the button sequence and you should see “ON” in the display.
The duct error codes can be disabled on the models listed below. If the model you are working on is listed below then simply follow the button sequence listed after the chart.
DLE34* / DLG34*
DLE36* / DLG36*
DLE70* / DLG70*
DLE71* / DLG71*
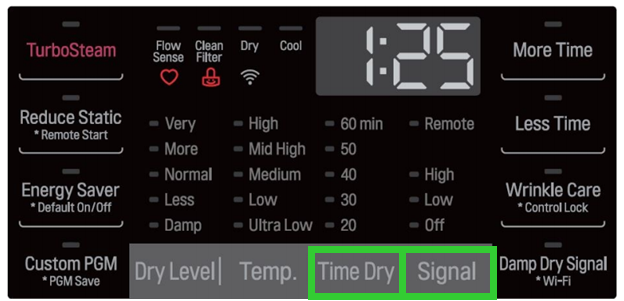
Power on then quickly press and hold both “Time Dry” & “Wrinkle Care” buttons simultaneously for 3 seconds.
See picture below.
You should see “OFF” in the display. To re-enable the duct error codes just repeat the button sequence and you should see “ON” in the display.
The duct error codes can be disabled on the models listed below. If the model you are working on is listed below then simply follow the button sequence listed after the chart.
WKE1* / WKG1*
RV13S1*MJW
Power on then quickly press and hold both “Less Time” & “Energy Saver” buttons simultaneously for 3 seconds.
See picture below.
You should see “OFF” in the display. To re-enable the duct error codes just repeat the button sequence and you should see “ON” in the display.
The duct error codes can be disabled on the models listed below. If the model you are working on is listed below then simply follow the button sequence listed after the chart.
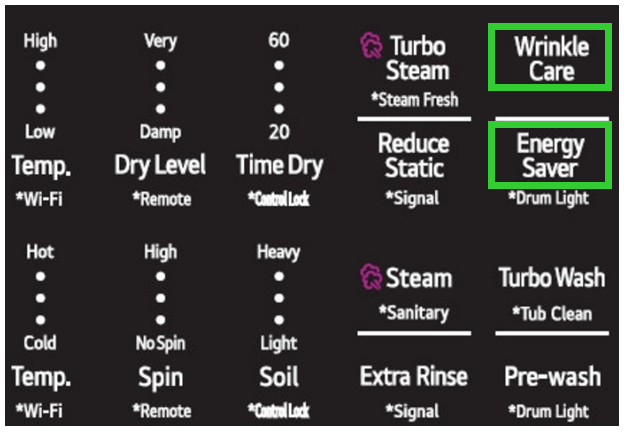
WK22*
WKEX2*/WKGX2*
RV13S*
Power on then quickly press and hold both “Wrinkle Care” & “Energy Saver” buttons simultaneously for 3 seconds.
See picture below.
You should see “OFF” in the display. To re-enable the duct error codes just repeat the button sequence and you should see “ON” in the display.
The duct error codes can be disabled on the models listed below. If the model you are working on is listed below then simply follow the button sequence listed after the chart.
DLEX55* / DLGX55*
DLEX65* / DLGX65*
DLEX67* / DLGX67*
DLEX86* / DLGX86*
① Press and hold Hold ‘Steam + Energy Saver’ button for 3 seconds.
② Display window will show “Duct Sensing Off”.
③ Duct blockage error doesn’t display anymore during operation.
(But it can be shown in installation test)
You should see “Duct Sensing Off” in the display. To re-enable the duct error codes just repeat the button sequence and you should see “Duct Sensing On” in the display.